Looking for other crafty inspirations? Check out the patterns I have for sale in my Etsy Shop.
Here’s how I’ve been doing my reverse applique tops, I just love how these turn out!
Aside, whenever I post how to do something, I worry that someone will tell me that’s not how it’s really supposed to be done. This is how I do it, it works for me. If you know another way, good for you. I hope this helps those of you who are wanting to try this out, but need a little nudge.
First, choose your design. For a first try, I recommend a simple shape (the toes on my froggie were a bit tricky, so try something with fewer turns at first, then you can progress to more difficult images). I use google image search when I’m looking for ideas, I search, for example, “frog silhouette” and see what comes up. If you find the perfect image, use that, or you can draw an image inspired by what you find.
Here is my shirt front, contrast fabric, and the froggie I drew (I drew one half, folded the paper and cut it out, so it’s symmetrical). I cut out my image so I can sew around it, but you could put it on tissue paper or the like and sew through it, you’d just have to pick the paper out of the stitches later.
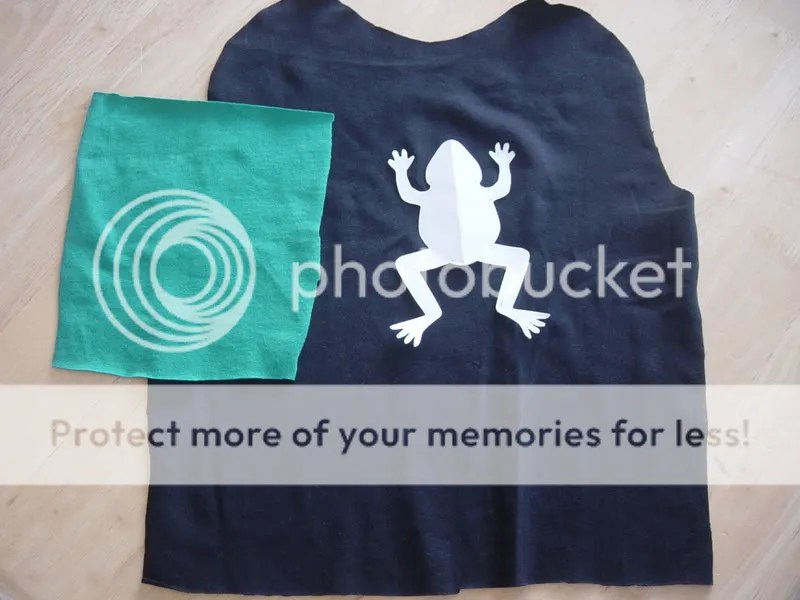
I place the contrast fabric behind my shirt front, making sure there’s plenty of room around the edges, then place the image on top of the shirt front, pinning everything in place. I like to center the image from side to side, but place it more to the top of the shirt.

Here you can see the contrast fabric pinned on behind:

Now, you’ll use a fairly short stitch length to sew around your image. I started at the froggie’s “armpit”, stopping with needle down to pivot at any turns:

Here’s another shot, a bit further around the frog. Stop to take out/reposition any pins that are in your way, but be careful not to skew your template from where it started.

Whew! I made it all the way around!

And, after I take out the pins/template:

Here’s what it looks like from the back, you can see the stitching better here:

Now, I use a small, sharp pair of scissors to cut out the image from my shirt front, just inside the stitching line. Since knits do not ravel, I leave the edges unfinished. I like the vintage look the edges get when they roll a bit after being washed.
Start by pulling the layers apart and snipping a little in the middle. You do not want to cut through your contrast fabric, so be careful!

I put my hand behind the contrast fabric while I’m cutting, so I know I’m only cutting the shirt panel (black fabric here):

Now, I’m done trimming out my applique! Stop and admire your work:

On the back, you’ll want to trim away the extra contrast fabric:

Now, sew up your shirt, and wait for the compliments to start rolling in!
Looking for other crafty inspirations? Check out the patterns I have for sale in my Etsy Shop.


Wow-that’s awesome! I love it! Thanks for the idea. 🙂 I stumbled upon your site through a comment on Craftster. You sew very nice things. 🙂
Thanks, Katie!
Thanks for posting this… I think I’m going to try one RIGHT NOW!
Oh, that’s cool! 🙂 Cute one!
Awesome! Thank you! Definitely going to try this!
Wow, I just found your site and the reverse applique tutorial. I love your site and projects. I have a young boy and a young girl and I continue to seek out ideas for handmade boy clothes. You have some great ideas. Thanks for sharing. I will be adding you to my blogroll. 🙂
**AWESOME** Thank you so much for sharing.. really can’t wait to try it out…Think I will try a sitting cat though..I am a beginner at this..and really love your idea.. Thanks Tina
This is one great tutorial! Love your little frog and can’t wait to try it myself!Thank you!!!
su-weet! i will definitely have to try this!
Great tutorial! I’ve not seen reverse applique done like this, thanks!
Anjea
http://quiltedepee.wordpress.com
really cute. i’m doing this for some baby onesies i got for a $1 and putting this reverse applique on them for gifts. thanks!!
Wow, what else is there to say. Thenk you very much for yout instructions and pictures. Now I can do it.
Ann
This is great! Such detail. I have tons of tshirts I need to do something with.
very interesting. 🙂
what a great idea , it easy and very cutet thank you sharing 🙂
Straightforward and to the point, layman’s terms. Now I’m willing to try it. You make it look easy. Thank you.
Thanks for taking the mystery out of this technique! I’m ready to try it.
I have a question:
If you’re not using knits, what do you do to prevent the edges from unraveling or just looking crumby after a little while?
Great tutorial! I’m hooked!
Thanks…I googled how to reverse applique…I could not figure out how that is done from looking at a quilt. You made the visual perfectly. God Bless. May your day be full of GRACE.
Chriss
Thanks for a great, straight-forward tutorial! (I found it through a Google search — man, I love the internet.)
Was reading on craftapple and found your site, thanks for the tutorial, it was so simple.
Wonderful!!! I can’t wait to try this on some shirts for my kids. Thanks for such a great, quick, easy tutorial!
thanks that was very helpful…u should do a bag that is so cute and nice neat work
Thanks for the tutorial. I am linking to it on my blog tomorrow.
Come see allysonadeney.wordpress.com/
Ally
Awesome tutorial! I think I will try it this weekend!! Thank you so much for posting this–very clear and easy to follow, and I love the shot of the frog when it has just one turquoise arm—like it’s “emerging” from the shirt!
Thanks so much for your tutorial. I sew for 2 small grandkids, 2 & 4 years old. Since all the RTW clothes nowdays have applique or some kind of embellishment, plain outfits seem drab no matter how cute the fabric or style. I can’t wait to try this technique!
I am having so much fun making undies from your tutorial and pattern that I purchased. They are so unique, and the kids & their mom love them. It was well worth the money.
That is the most adorable frog I’ve ever seen. Very cute, thanks for sharing.
What a great technique. Thanks for sharing it!
Wow, you are a natural teacher! That was fantastic.
I am getting ready to make a baby quilt and one of the fabrics I wanted to use to do a regular applique is Minky. But I’ve read it is just a nightmare to sew with, much less to try to applique. So I got the idea to do a reverse applique, with the Minky on the backside. My top fabric, the one that gets cut away to create the image, would just be a quilter’s cotton though. I am not sure if this would work. I would have to stitch it down with an applique stitch and again, not sure how the Minky is going to behave as the underneath fabric. Do you or does anyone reading this have any suggestions? Thanks!
p.s. I thought I’d stick with really simple shapes.
Thank you! I have struggled with applique for so long.
I can’t wait to try this out for my newest grandson.
Very Sincerely Yours,
– – Annie
Thanks for the post! This is just what I needed to help me with some Christmas presents this year. Very clear and easy – looks like a lot of fun!
wow what a great idea.
thanks for sharing.
Thank you so much for this. You’ve made it pretty simple to understand. I’m trying reverse applique on a blouse I’m making and I’ll use your technique.
Thanks again
Yay–thank you!! Such a great tutorial. I ‘ve never done reverse applique and never “needed” to do it. I just saw a great idea in a catalog and want to try it out but needed to figure out reverse applique. These instructions are great! I’ll be sure to link to you if I get my project done.
And your frog shirt is adorable, too!